Crafting the Dad Fixer of Everything 3D Shadow Box: A Guide to Precision and Personalization
In the realm of personalized gifting and creative crafting, few projects offer the same blend of technical challenge and emotional resonance as a multi-layered paper art piece. The Dad Fixer of Everything 3D Shadow Box stands out not merely as a decorative item, but as a testament to precision engineering applied to sentiment. For creators, hobbyists, and small business owners who specialize in custom gifts, understanding the workflow behind this specific design is essential. It is not simply about cutting paper; it is about managing depth, color gradation, and structural integrity to produce a final product that honors the recipient’s identity—in this case, the father who fixes everything.
This article explores the practical implementation of the Dad Fixer of Everything 3D Shadow Box design within a professional or serious hobbyist workflow. We will examine how to prepare the digital assets, select compatible materials, and execute the assembly process to ensure a high-quality outcome that aligns with modern standards for handmade goods.
Understanding the Design Architecture
Before initiating any physical production, one must analyze the digital blueprint. The Dad Fixer of Everything 3D Shadow Box relies on a complex layering system. Specifically, it utilizes 10 layers of papercut mechanics. This depth is significant. In standard shadow box projects, three to five layers are common. Ten layers require meticulous planning regarding spacing and adhesive selection to prevent the final piece from becoming bulky or unstable.
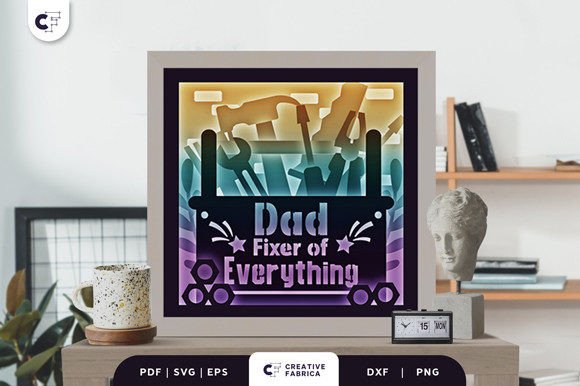
The design features a mechanical aesthetic, centered around the quote “Dad Fixer of Everything.” This text is presented in a large, bold font, serving as the focal point. Behind this central message, the silhouette of various tools—wrenches, screwdrivers, and handsaws—creates a contextual backdrop. The integration of these elements is not random; it follows a visual hierarchy that guides the viewer’s eye from the foreground text to the detailed background machinery. For the creator, this means that each layer must be cut with extreme precision. Any misalignment in the lower layers will compound as you move toward the front, potentially obscuring critical details or disrupting the intended 3D effect.
The color scheme employs a gradation technique. This is not a monochromatic project. The shift in hues across the ten layers adds dimensionality, simulating light and shadow even before the box is illuminated. Understanding this gradient is crucial during the material selection phase, as the wrong paper tone can flatten the visual impact rather than enhance it.
File Preparation and Compatibility
Efficiency in crafting begins with file management. The Dad Fixer of Everything 3D Shadow Box is provided in multiple formats: SVG, PDF, EPS, PNG, and DXF. Each format serves a specific function in the production workflow.
- SVG (Scalable Vector Graphics): Ideal for users of Cricut Design Space, Silhouette Studio, or other vector-based cutting software. SVGs allow for easy manipulation of individual layers, enabling you to assign specific cut lines and colors to each of the ten stages.
- DXF: Often preferred by users of older cutting machines or industrial plotters that do not natively support SVG imports. It ensures compatibility across a wider range of hardware.
- PDF and EPS: These are best suited for professional printing services or laser cutting setups where vector precision is required without the need for extensive editing within consumer-grade craft software.
- PNG: Useful for previewing the design or for digital mockups, but not suitable for cutting paths due to its raster nature.
When preparing the files, it is vital to verify the scale. The design is sized at 20.32×20.32 cm (approximately 8x8 inches). Ensure your cutting mat and machine bed can accommodate this size, or adjust the scale proportionally if a different final dimension is required. However, resizing may affect the structural balance of the ten layers, so sticking to the original dimensions is recommended for first-time builds.
Material Selection and Quality Control
The choice of paper determines the durability and aesthetic quality of the shadow box. The design specifications recommend Encore Cardstock 80 lb cover (216 gsm). This weight is critical. Lighter paper (below 65 lb) may warp under the tension of adhesive or fail to hold its shape when layered ten deep. Heavier cardstock (above 110 lb) might be too rigid, making it difficult to achieve clean cuts on intricate mechanical details like gear teeth or screwdriver handles.
Consistency in material is key. Using the same brand and weight for all ten layers ensures uniform thickness, which simplifies the spacing process. If you opt for different textures or finishes, be aware that they may absorb adhesive differently, leading to uneven drying times or visible glue marks. For those looking to source materials, visiting a specialized supplier like the 12×12 Cardstock Shop can provide access to high-quality stocks that meet these rigorous demands. Note that this is a paid link at no extra cost to you, but it directs you to resources that align with the technical requirements of this project.
Color accuracy is another factor. The preview images serve as a guide, but actual final product color may vary due to lighting sources and paper batch differences. To mitigate this, order physical swatches if possible, or test cut a single layer from each color batch before committing to the full ten-layer set. This step prevents the disappointment of discovering a color mismatch after hours of assembly.
Assembly Workflow and Structural Integrity
Assembly is where the digital design becomes a physical object. The process should be approached methodically, working from the back layer to the front. This reverse-order assembly allows you to check alignment at each stage.
- Preparation: Organize all ten cut layers in numerical order. Use tweezers to remove weeding waste from intricate areas, such as the internal spaces of wrenches or gear cogs.
- Spacing: To achieve the 3D effect, spacers are required between layers. Foam tape is commonly used, but for a ten-layer design, consider using varying thicknesses of foam or stacked cardstock strips to create a gradual depth increase. This prevents the front layers from pressing against the glass or frame prematurely.
- Adhesion: Apply adhesive sparingly. Excess glue can seep out from the sides, damaging the visual clarity of the mechanical design. Use a fine-tip applicator for precision.
- Alignment: Use registration marks if included in the SVG file, or create your own subtle guides on the backing board. Align the central “Dad Fixer of Everything” text perfectly, as any tilt here will be magnified by the surrounding layers.
- Framing: Once all layers are secured, place the assembly into a deep shadow box frame. Ensure the glass does not compress the top layer, which could cause buckling over time.
This structured approach minimizes errors and ensures that the mechanical theme remains sharp and defined. The silhouette of the tools in the background should appear to recede naturally, creating a sense of depth that complements the bold foreground text.
Integration into Gift-Giving and Business Workflows
For entrepreneurs and content creators, the Dad Fixer of Everything 3D Shadow Box is more than a single product; it is a template for scalable customization. The SVG files allow for easy modification of the central quote. While “Dad Fixer of Everything” is the default, the same mechanical layering structure can be adapted for other professions or hobbies by swapping the text and tool silhouettes. This flexibility makes the underlying design a valuable asset in a broader product line.
From a marketing perspective, this item fits seamlessly into seasonal campaigns, particularly for Father’s Day. However, its appeal extends beyond holidays. It serves as a recognition piece for retirees, a housewarming gift for handy homeowners, or a tribute to mentors in technical fields. By positioning the product as an acknowledgement of skill and labor, you elevate it from a simple decoration to a meaningful token of appreciation.
Furthermore, the digital nature of the product means it can be integrated into hybrid business models. You might sell the digital files to DIY enthusiasts while offering assembled versions as premium items. This dual approach captures both the maker market and the convenience-seeking consumer. Ensure that your product descriptions clearly state the number of layers, the required paper weight, and the final dimensions to manage customer expectations and reduce support queries.
Long-Term Value and Maintenance
A well-constructed shadow box is a lasting keepsake. To ensure longevity, advise recipients to keep the frame out of direct sunlight, which can fade the colored cardstock over time. Dust accumulation between layers can be minimized by ensuring the frame is properly sealed during assembly. For creators, offering a care guide alongside the product adds value and demonstrates professionalism.
In conclusion, the Dad Fixer of Everything 3D Shadow Box represents a convergence of digital precision and tactile craftsmanship. By respecting the ten-layer architecture, selecting appropriate 216 gsm cardstock, and following a disciplined assembly workflow, creators can produce a high-impact gift that resonates with its audience. Whether you are a seasoned papercraft artist or a small business owner expanding your catalog, this design offers a robust framework for delivering quality and sentiment in equal measure.